Typing Math in Microsoft Word
Written by Jennifer Marsala. Last updated June 30, 2026
Description
This tutorial is designed to help students and teachers understand how to type mathematics in Microsoft Word by 1) selecting symbols and functions from the equation toolbar, 2) using the Ink Equation option to convert handwritten math to typewritten math, 3) typing keystrokes known as Math AutoCorrect codes for math symbols and functions, and/or 4) using LaTeX commands.
Creating accessible mathematics
The Math AutoCorrect codes in this tutorial can help all users to type mathematics quickly without searching for symbols in Microsoft Word's equation toolbar, but these keystrokes are particularly useful for those who are visually impaired, since the toolbar can be difficult to navigate with a screen reader.
The math content created with Microsoft Word's equation tool is accessible with the JAWS screen reader and also with NVDA version 2026.1 or later, which includes built-in MathCAT support. (Previous versions of NVDA require the MathCAT add-on.)
This webpage should be accessible using either JAWS or NVDA (using either built-in MathCAT support or the MathCAT add-on) when using Google Chrome, Microsoft Edge, or Firefox. Browser updates may occasionally affect accessibility; please report any issues via the feedback section.
See the University of Houston's JAWS screen reader tutorial to learn how to use JAWS and to learn tips for creating accessible documents.
Table of contents
Click on any link below to navigate to that portion of the document.
- Description
- 1. Opening Microsoft Word's built-in equation tool
- 2. Creating math content using the equation toolbar
- 3. Exiting the equation tool
- 4. Converting handwritten math to typewritten math
- 5. Math AutoCorrect codes for common math symbols and functions
- 6. Troubleshooting for Math AutoCorrect codes
- 7. Editing equations and switching between linear & professional modes
- 8. Discovering additional Math AutoCorrect codes
- 9. Adding Math AutoCorrect codes
- 10. Typing equations with LaTeX in Word
- 11. Text mode
- 12. Equation display size and other options
- 13. Setting a Word document to open in read-only mode
- 14. Math accessibility tips
- 15. Typing math in PowerPoint
- 16. Demonstrations of math accessibility features within Microsoft 365 products
- Contact / Feedback
1. Opening Microsoft Word's built-in equation tool
Microsoft Word's equation tool can be accessed by selecting Insert from the top ribbon, and then selecting Equation from the Symbols group at the far-right side of the ribbon. You can alternatively use the keyboard shortcut ALT + EQUALS to open the equation tool.

An equation box appears within the Word document as shown in the screenshot below:
![]()
The equation toolbar also appears at the top of the screen, as shown below.

Note: The equation toolbar disappears whenever you are working on content other than mathematics. If you want to edit an equation and can no longer see the equation toolbar, first place your cursor within the desired equation. If the equation toolbar does not show up, click the Equation menu at the very top of Word's ribbon. (In the above screenshot, the Equation menu is blue and is located to the right of the Acrobat menu.) The Equation menu is only visible when your cursor is placed within math content.
2. Creating math content using the equation toolbar
Exploring the equation toolbar
Note: Alternative Math AutoCorrect codes are described later in this document for users who find it easier to type keystrokes than to choose math symbols from the equation toolbar.
After selecting Insert and Equation or the shortcut ALT + EQUALS, the equation toolbar appears at the top of the screen. You can use selections from this toolbar along with characters from your keyboard to type math content.
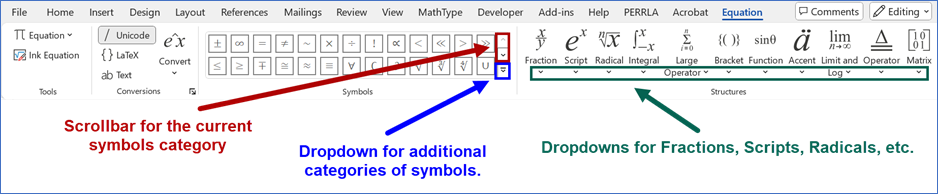
Use the Symbols scrollbar, outlined in red above, to scroll through symbols in that category. Also explore the dropdown menus in the Structures group, outlined in green above, to view selections for fractions, scripts, radicals, etc.
Use the Symbols dropdown, outlined in blue above, to view the full gallery of symbols for the current category and to select and view other symbol categories. The names of the eight symbol categories are shown in the screenshot below.

Three examples are given below to illustrate how the equation toolbar can be used to create math content.
Equation Toolbar Example 1
Use the equation toolbar to create the following math content: $x-y=\displaystyle\frac{3}{5+z}$.
Follow the steps below:
-
1)Select Insert + Equation or ALT + EQUALS. An equation box appears within the document.
-
2)Type the following characters from your keyboard within the equation box: the letter x, then the dash symbol (for the minus sign), then the letter y, then the equals sign.

-
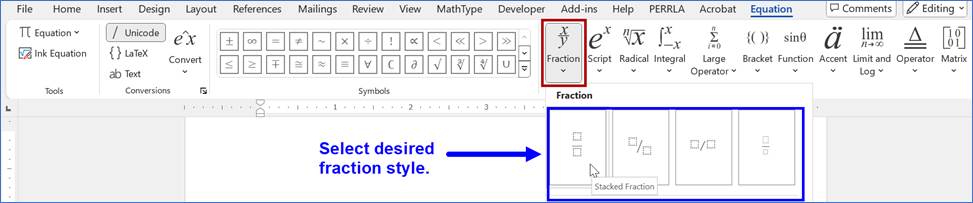
3)Choose Fraction from the Structures group of the toolbar and choose the fraction style that you prefer.
-
4)Two input boxes appear within the fraction — one for the numerator and one for the denominator, as shown in the screenshot below.
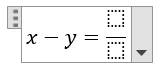
To type $\displaystyle\frac{3}{5+z}$ : Place your cursor in the numerator and type the number 3. Then place your cursor in the denominator (or use the down arrow to navigate from numerator to denominator) and then type 5+z. Note that you do not need parentheses around the 5+z, due to the input box that Word created for the denominator. The final output should appear as $x-y=\displaystyle\frac{3}{5+z}$ . (Refer to the next section to learn how to exit the equation tool.)
Note: Fractions can alternatively be typed with keystrokes; the Math AutoCorrect codes for common math symbols and functions are discussed later in this document.
Equation Toolbar Example 2
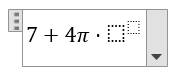
Use the equation toolbar to create the following math content: $7\pm 4\pi \cdot {\Omega}^{2}$.
Follow the steps below:
-
1)Select Insert + Equation or ALT + EQUALS. An equation box appears within the Word document.
-
2)Type the number 7 from your keyboard.
-
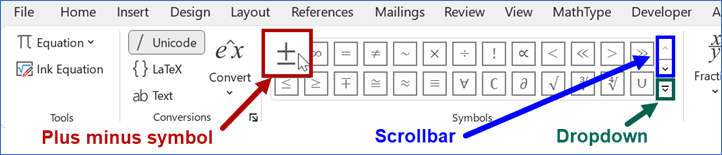
3)Look for the $\pm $ symbol in the Symbols group and select that symbol. If you cannot find it, click on the Symbols group dropdown and make sure you are viewing the Basic Math category. (If you need to change the symbol category, refer to the earlier section on exploring the equation toolbar.)
-
4)Type the number 4 from your keyboard.
-
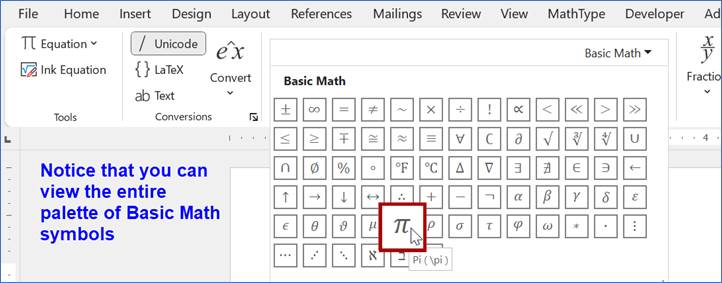
5)To type $7\pm 4\pi \cdot {\Omega}^{2}$, we need to find $\pi $, which is located in the Basic Math symbols category. (It is also found in the Greek Letters category, shown later in this problem.) Click on the Symbols dropdown to view all symbols in the Basic Math category (recommended) or use the scrollbar to scroll up or down to find the symbol.

The entire Basic Math gallery is shown below. Find the $\pi $ symbol and select it.
-
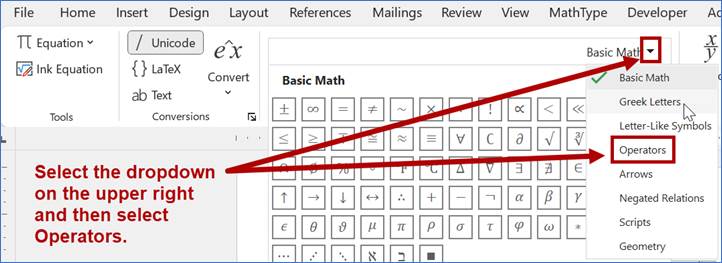
6)To type $7\pm 4\pi \cdot {\Omega}^{2}$, we now need to find the multiplication symbol that looks like a centered dot. It does not appear within the Basic Math category of symbols. (There is an operator in the same row as $\pi $ that resembles a multiplication dot but is a small square rather than a small circle.)
The dot multiplication symbol can be found in the Operators category of symbols. Switch symbol categories from the Basic Math category to the Operators category as shown in the screenshot below.
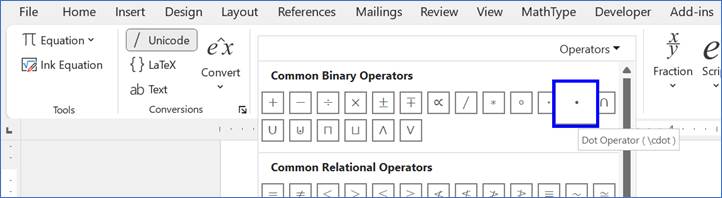
A long gallery of Operators symbols should appear. Choose the dot multiplication symbol from the first row of symbols, as shown in blue below.
-
7)To produce the output $7\pm 4\pi \cdot {\Omega}^{2}$, we now need to type ${\Omega}^{2}$.
First click the Script dropdown from the Structures group, and then choose the Superscript option.
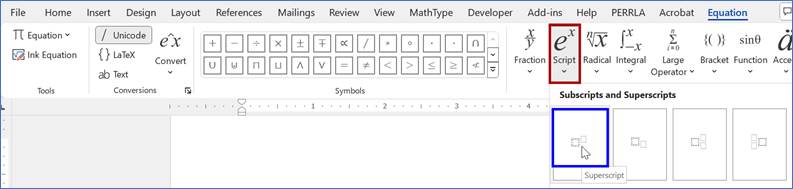
Your equation should look like the one below, with one input box for the base and another for the exponent:
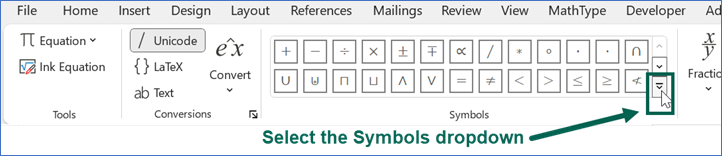
Next, we need to find $\Omega$, which is the uppercase Greek letter Omega. It can be found in the Greek Letters category of the Symbols group. Switch symbol categories to Greek Letters as shown in the screenshots below.
Find $\Omega$ in the Greek Letters gallery. (Side note: $\pi $ also appears in this group.) Place your cursor in the input box for the base, which was created by the Superscript structure, and then select the $\Omega$ symbol as shown below.

Lastly, place your cursor in the input box for the exponent and type the number 2.
Your final output should be $7\pm4\pi \cdot {\Omega}^{2}$. (Refer to the next section to learn how to exit the equation tool.)
Note: The symbols for $\pi $, the multiplication dot, the superscript, and $\Omega$ can alternatively be typed with Math AutoCorrect codes, discussed later in this document.
Equation Toolbar Example 3
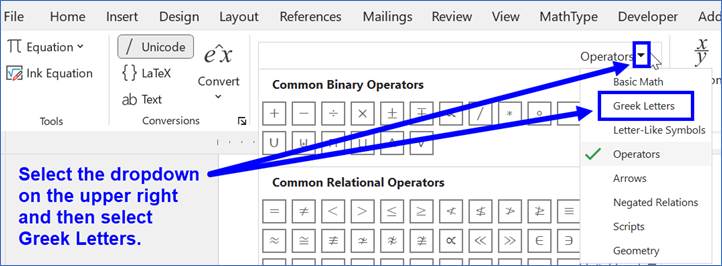
Use the equation toolbar to create the following math content: $x=\sqrt{y+1}+4$.
Follow the steps below.
1)Select Insert + Equation or ALT + EQUALS. An equation box appears within the Word document.
2)Type the x key and the equals key from your keyboard.
3)Select the square root symbol from the equation toolbar, using one of the following two methods:
Option 1: Choose the square root symbol from the Basic Math category of the Symbols group. (If you need to change the symbol category, refer to the earlier section on exploring the equation toolbar.)

Option 2: You can instead choose the square root symbol from the Radical dropdown of the Structures group.
The square root output looks different with each method as shown in the screenshot below:

These two square root options require slightly different steps for additional input, as described below.
4)If you selected the square root symbol from the Symbols group (Option
1):
Type (y+1) from your keyboard; the parentheses are needed since there is more
than one term under the square root. Then press the spacebar to complete the
square root; notice that the parentheses disappear but the entire expression y+1
is placed under the square root. Finally, type +4 from your keyboard.
If you used the square root symbol from the Radical
dropdown (Option 2):
There is an empty input box within the square root. Place your cursor inside
that box, type y+1 from your keyboard (parentheses are not needed), press the
right arrow key to exit the square root, and type +4.
In both instances, the output is as follows. (Refer to the next section to learn how to exit the equation tool.)
![]()
Note: The square root symbol can instead be typed with Math AutoCorrect codes, discussed later in this document.
3. Exiting the equation tool
If you are typing math content on a line by itself (or at the very end of a line) and are finished typing content for that line, simply press enter to go to the next line and exit equation mode in Word. You can then type regular text on the new line or can begin another equation using ALT + EQUALS or Insert + Equation again.
If you are typing inline math content (math content which is contained in the same line as regular text) and wish to resume typing regular text on that same line after the math content, press the right arrow key to exit the math zone. Then press the spacebar key to create a space between the math content and your next word and type the rest of your sentence as usual. (Omit the spacebar key if you are typing punctuation immediately after the math content.)
4. Converting handwritten math to typewritten math
Microsoft Word's equation tool can recognize handwritten mathematics and convert it to typewritten mathematics. If you can write on your screen with a stylus or with your finger, or if you are adept enough to write using your mouse, press Insert + Equation or ALT + EQUALS, then select Ink Equation from the Tools group.
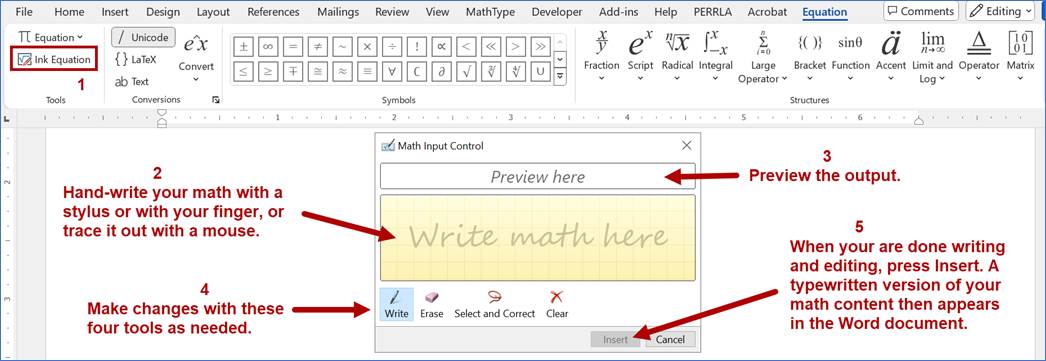
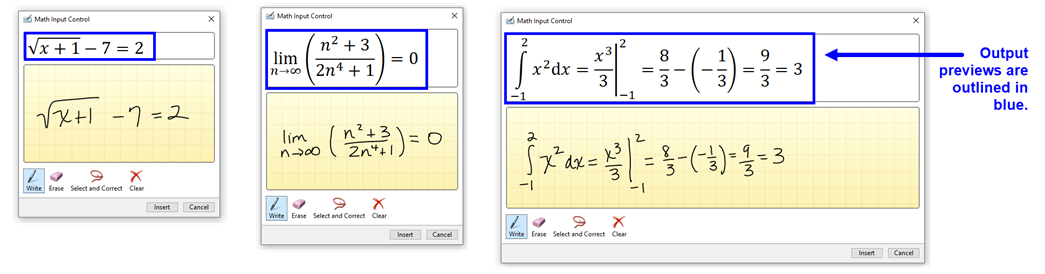
Hand-write the desired math in the yellow input area and look at the preview pane. You can change your input with the Write, Erase, Select and Correct, and Clear tools. (You can even erase or select/correct one character at a time!) When you are done writing, select Insert and the equation will appear in the main document. You can also edit after insertion within the standard equation box. Three examples of handwritten equations and previewed typewritten output are shown below.
5. Math AutoCorrect codes for common math symbols and functions
Jump to alphabetical list of codes
In the alphabetical list below, you can find Math AutoCorrect codes for many common math symbols and functions in Microsoft Word. AutoCorrect codes are successive keystrokes, recognized by Microsoft Word, which produce another character or set of characters. Math AutoCorrect codes can be used as an alternative to navigating the equation toolbar. These Math AutoCorrect codes can be typed within Word's equation tool, which can be accessed by pressing ALT + EQUALS. Make sure that you also read the instructions above on exiting the equation tool to resume typing regular text.
The Conversions group of the equation toolbar should be set to Unicode for the full list of Math AutoCorrect codes to work; Unicode should be the default unless you have changed it.

The list below is not exhaustive. To find additional Math AutoCorrect codes — and to find out about a similar list which is organized by subject — see the section on discovering additional Math Autocorrect codes. If the keystrokes in the list are not working for you, see the section on troubleshooting for Math AutoCorrect codes.
Most characters in the Math AutoCorrect codes are lowercase, but there are times when a letter is capitalized; some examples of capitalization are at the beginning of codes involving uppercase Greek letters, within the codes for double-struck letters, and for more pronounced symbols such as a double arrow instead of a single arrow.
Notes for screen reader users: When reading through the Math AutoCorrect codes and instructions to produce sample math expressions, you may want to use the left and right arrows to step through each code one character at a time to make sure that each character is properly understood.
Alphabetical list of math symbols and functions along with their Math AutoCorrect codes
Browse symbols by letter:
A
Absolute value: See Vertical bars.
Addition/plus: use keyboard plus sign, +.
alpha (lowercase): \alpha (all lowercase) followed by spacebar. Produces the output $\alpha .$
AND: Type \and, \land, or \wedge, followed by spacebar, to produce the logical AND operator, $\wedge$.
Angle: \angle followed by spacebar. Produces the output $\angle .$
Approaches: See Right arrow.
Approximately equal: \approx followed by spacebar. Produces the output $\approx$.
The negation “not approximately equal” can be obtained by first typing a forward slash: /\approx produces the output $\not\approx$. The code \notapprox also produces the output $\not\approx$.
Arc: Type \arc or \overparen, followed by the content you desire to place under the arc symbol (use parentheses as needed), followed by spacebar. To type $\overparen{AB}$, type \arc(AB) followed by spacebar or \overparen(AB) followed by spacebar.
Average: See Bar.
B
Bar: To type x-bar, denoted by $\bar{x}$, type x followed by \bar followed by two spaces.
beta (lowercase): \beta (all lowercase) followed by spacebar. Produces the output $\beta .$
Biconditional: Type \biconditional or \leftrightarrow (all lowercase), followed by spacebar, to produce the output $\leftrightarrow$. For the more formal version, type \Biconditional or \Leftrightarrow (first letter uppercase), followed by spacebar, to produce the output $\Leftrightarrow$.
Bottom: Type \bot, \false, or \contradiction, followed by spacebar, to produce the output $\bot$. Note that this also represents the Perpendicular symbol.
C
Cents: \cents followed by spacebar. Produces the output ¢.
Change: See Delta (with uppercase D).
chi (lowercase): \chi (all lowercase) followed by spacebar. Produces the output $\chi $.
Circle: \circle followed by spacebar. Produces the output ◯.
Circle with dot: Type \odot or \xnor (used for the logical Exclusive NOR), followed by spacebar, to produce the output $\odot$.
Complex numbers: See Set of complex numbers.
Composition of functions/composed with: Type \circ or \comp, followed by spacebar, to produce the output $\circ .$
Congruence/congruent to: \cong followed by spacebar. Produces the output $\cong .$
The negation “not congruent to” can be obtained by first typing a forward slash: /\cong followed by spacebar produces the output $\ncong$. The codes \ncong and \notcong, followed by spacebar, also produce the output $\ncong$.
Contains as member: Type \ni, \contains, or \owns, followed by spacebar, to produce the output $\ni$.
Contour integral: \oint, followed by spacebar. Produces the output $\oint$. See Integrals for additional instructions on typing integrals.
Cosecant: csc followed by spacebar, followed by the content you want to type within the function (use parentheses as needed), followed by the right arrow key to exit the cosecant function to type more math content.
Cosine: cos followed by spacebar, followed by the content you want to type within the function (use parentheses as needed), followed by the right arrow key to exit the cosine function to type more math content.
Cotangent: cot followed by spacebar, followed by the content you want to type within the function (use parentheses as needed), followed by the right arrow key to exit the cotangent function to type more math content.
Cross product: See Multiplication.
Cube root: Type \cbrt or \3root, followed by spacebar, followed by the content that you want included inside the cube root (use parentheses as needed), followed by spacebar.
-
•To obtain $\sqrt[3]{x}$, type \cbrt followed by spacebar, followed by x, followed by spacebar.
-
•To obtain $\sqrt[3]{x+5}$, where you want the x+5 inside the cube root, you must use parentheses: type \cbrt followed by spacebar, followed by (x+5), followed by spacebar.
-
•To obtain $\sqrt[3]{x+5}+7$, where you want the x+5 inside the cube root and the +7 outside the cube root: type \cbrt followed by spacebar, followed by (x+5), followed by spacebar, followed by +7.
D
Degree/degrees: Type \deg or \degree, followed by spacebar. No superscript-related keystroke is necessary. To produce the output $30°$, type 30\deg then spacebar.
Degrees Celsius: \degc followed by spacebar. Produces the output ℃.
Degrees Fahrenheit: \degf followed by spacebar. Produces the output ℉.
delta (lowercase): \delta (all lowercase) followed by spacebar. Produces the output $\delta$.
Delta (uppercase): \Delta (with uppercase D) followed by spacebar. Produces the output $\Delta$.
Determinant: See Vertical bars.
Distributed as: See Similarity/similar to.
Division/divided by: To create a division symbol that looks like a horizontal line with a dot above and below, type \div followed by spacebar. Produces the output $\div $. (See Fractions to create a fraction.)
Dot product: See Multiplication.
Double integral: Type \doubleint or \iint to produce the double integral symbol, $\iint$. See Integrals for additional instructions on typing indefinite and definite integrals.
Double prime: Type two apostrophes (single quote marks) followed by spacebar. Or type \dprime, \pprime, or \doubleprime, followed by spacebar. To type $f''(x)$: type f, then two apostrophes, then spacebar, then (x), then spacebar.
Down arrow: For the single-line version, type \downarrow followed by spacebar to produce the output $\downarrow$. For the double-line version, type \Downarrow (with uppercase D) to produce the output $\Downarrow$.
E
Element of: Type \in, \element, or \belongs, followed by spacebar, to produce the output $\in $.
The negation “not an element of” can be obtained by first typing a forward slash: /\in, /\element, and /\belongs all produce the output $\notin$. The code \notin also produces the output $\notin$.
Ellipsis:
-
•Type \dots followed by spacebar or type three consecutive periods to produce the output $\dots$, which displays three dots horizontally at the base of the given line.
-
•Type \cdots followed by spacebar to produce the output $\cdots$, which displays three dots horizontally at the middle of the given line.
-
•Type \vdots followed by spacebar to produce the output $\vdots$, which displays three dots vertically.
-
•Type \ddots followed by spacebar to produce the output $\ddots$, which displays three dots diagonally with downward slope from left to right.
Empty set: \emptyset followed by spacebar. Produces the output $\varnothing $.
Entails: Type \models, \entailment, or \true, followed by spacebar, to produce the output $\models$.
epsilon (lowercase): Type \epsilon or \varepsilon followed by spacebar (all letters lowercase) to produce the output $\epsilon$ and $\varepsilon$, respectively.
Equals: Use the keyboard equals sign, =.
Equilibrium: \rightleftharpoons followed by spacebar. Produces the output $\rightleftharpoons$.
eta (lowercase): \eta (all lowercase) followed by spacebar. Produces the output $\eta $.
Exclusive NOR (XNOR): See Circle with dot.
Exclusive OR (XOR): Type \oplus or \xor, followed by spacebar, to produce the output $\oplus$.
Exponent: Use the caret key, SHIFT + 6, followed by the desired exponent followed by spacebar. Remember to include parentheses around the exponent (and/or the base) if needed.
-
•$y^2$ can be obtained by typing y^2 followed by spacebar.
-
•$3x^2+1$ can be obtained by typing 3x^2, then spacebar, then +1. (Also see note below.)
-
•$2^{x+1}$ can be obtained by typing 2^(x+1) followed by spacebar.
-
•$(x-5)^4$ can be obtained by typing (x-5)^4 followed by spacebar.
You can omit the spacebar after the exponent when you type other operators such as the plus sign immediately after the exponent; the expression $3x^2+1$ can be produced by typing 3x^2+1 (with no spaces). However, the spacebar after the exponent can NOT be omitted when the exponent appears at the end of the expression. For the output $y^2$, $2^{x+1}$, or $(x-5)^4$, the spacebar must not be omitted or the output will contain the caret symbol.
F
Factorial: use keyboard exclamation point, !.
For all: Type \forall or \foreach, followed by spacebar, to produce the output $\forall$.
Fourth root: Type \qdrt or \4root, followed by spacebar, followed by the content that you want included inside the fourth root (use parentheses as needed), followed by spacebar.
-
•To obtain $\sqrt[4]{x}$, type \qdrt followed by spacebar, followed by x, followed by spacebar.
-
•To obtain $\sqrt[4]{x+5}$, where you want the x+5 inside the fourth root, you must use parentheses: type \qdrt followed by spacebar, followed by (x+5), followed by spacebar.
-
•To obtain $\sqrt[4]{x+5}+7$, where you want the x+5 inside the fourth root and the +7 outside the fourth root: type \qdrt followed by spacebar, followed by (x+5), followed by spacebar, followed by +7.
Fractions: To create a vertically stacked fraction, type the numerator (use parentheses as needed), followed by the forward slash key, followed by the denominator (use parentheses as needed), followed by spacebar.
-
•To obtain $\frac{3}{7}$: type 3, then /, then 7, then spacebar. The fraction will appear larger if typed on its own line, as shown below.
$\displaystyle\large\frac{3}{7}$ -
•To obtain $\frac{x+1}{x+3}$, you must type parentheses around the numerator and denominator, i.e., (x + 1), then /, then (x+3), then spacebar.
-
•To obtain $\frac{3}{5y}$: type 3, then /, then 5y, then spacebar. (You can type parentheses around the denominator, 5y, which results in the same output.)
-
•To obtain $\frac{3}{5}y$: type 3, then /, then 5, then spacebar, then y.
-
•To create a fraction with empty placeholders for a numerator and denominator (as shown below), type the forward slash and the spacebar. Then go back and fill in the numerator and denominator.

To create a skewed fraction (where the fraction bar is slanted, the numerator is slightly raised, and the denominator is slightly lowered) use \sdiv instead of the forward slash and then press spacebar. Type 5, then \sdiv, then spacebar, then 7 to produce output similar to that which is shown below.
![]()
To create a linear fraction (where the fraction bar is slanted, and both the numerator and denominator are viewed at the same vertical level) use \ldiv instead of the forward slash and then press spacebar. Type 5, then \ldiv, then spacebar, then 7 to produce the output $5/7$.
G
gamma (lowercase): \gamma (all lowercase) followed by spacebar. Produces the output $\gamma $.
Gamma (uppercase): \Gamma (with uppercase G) followed by spacebar. Produces the output $\Gamma $.
Given: See Vertical bars.
Gradient: Type \grad or \nabla, followed by spacebar, to produce the output $\nabla$.
Greater than: Use the > key on the keyboard.
The negation, “not greater than” can be obtained by first typing a forward slash: /> produces the output $\not>$. Alternatively, type \ngt or \notgt to produce the output $\not>$.
Greater than or equal to: \ge or \geq followed by the spacebar. Alternatively, simply press the > key followed by the = key.
The negation “neither greater than nor equal to” can be obtained by first typing a forward slash: /\ge and /\geq followed by spacebar produce the output $\not\geq$. Alternatively, type \ngeq to produce the output $\not\geq$.
Greek letters: A number of Greek letters common to math and science fields are listed in this tutorial. The general method for typing Greek letters is described below.
-
•To create a lowercase Greek letter:
1) type the backslash key, 2) type out the name of the Greek letter, beginning with a lowercase letter and with all other letters also in lowercase, and 3) press spacebar.
Example: To type the lowercase Greek letter omega: type \omega (all lowercase), then spacebar, which produces the output $\omega $. -
• To create an uppercase Greek letter:
1) type the backslash key, 2) type out the name of the Greek letter, beginning with an uppercase letter and with all other letters in lowercase, and 3) press spacebar.
Example: To type the uppercase Greek letter Omega: type \Omega (with uppercase O), then spacebar, which produces the output $\Omega $.
H
Hat: To type $p$-hat, denoted by $\hat{p}$, type $p$ followed by \hat followed by two spaces.
Hyperbolic trigonometric functions: Hyperbolic sine, hyperbolic cosine, and hyperbolic tangent can be written as sinh, cosh, and tanh; notice the h at the end of each code. Hyperbolic secant, hyperbolic cosecant and hyperbolic cotangent are written as sech, csch, and coth; notice the h at the end of each code. Each of these six Math AutoCorrect codes should be followed by the spacebar, followed by the content within the function (use parentheses as needed), followed by the right arrow key to exit the hyperbolic function in order to type more math content.
I
If and only if: See Biconditional.
If... then: See Right arrow.
Implication, Implies: See Right arrow.
Infinity: Type \infty or \infinity, followed by spacebar, to produce the output $\infty $.
To type negative infinity, type a dash (minus sign) before the infinity Math AutoCorrect code but while still within the equation tool, i.e., -\infty followed by spacebar produces the output $-\infty $.
Integers: See Set of integers.
Integrals:
For indefinite integrals (integrals without lower and upper limits), type
\int followed by spacebar, followed by the content that you want included
inside the integral. To produce the output $\int \left(x^2+1 \right)dx$, type \int followed by spacebar followed by (x^2+1)dx.
For definite integrals (integrals with lower and upper limits), type \int followed by an underscore symbol (SHIFT + MINUS) followed by the lower limit, followed by the caret key (SHIFT + 6) along with the upper limit, followed by spacebar, followed by the content you want included inside the integral. To produce the output $\int_{3}^{7}\left(x^2+1 \right)dx$, type \int_3^7, then spacebar, then (x^2+1)dx. If you type the math content on its own separate line, the integral symbol will be larger as shown below:
$\displaystyle\int_{3}^{7}\left(x^2+1 \right)dx$
Also see Double integral, Triple integral, Contour integral, Surface integral, Volume integral.
Intersection: Type \cap or \intersection, followed by spacebar, to produce the output $\cap $.
Inverse trigonometric functions:
To obtain the inverse sine, inverse cosine, or inverse tangent functions,
type arcsin or arccos or arctan, followed by spacebar, followed by the content
within the function (use parentheses as needed). Press the right arrow key to exit
each of these functions to type more math content.
To obtain the inverse cosecant, inverse secant, or inverse cotangent functions, type arccsc or arcsec or arccot, followed by spacebar, followed by the content within the function (use parentheses as needed). Press the right arrow key to exit each of these functions to type more math content.
iota (lowercase): \iota (all lowercase) followed by spacebar. Produces the output $\iota $.
K
kappa (lowercase): \kappa (all lowercase) followed by spacebar. Produces the output $\kappa $.
L
lambda (lowercase): \lambda (all lowercase) followed by spacebar. Produces the output $\lambda .$
Lambda (uppercase): \Lambda (with uppercase L) followed by spacebar. Produces the output $\Lambda$.
Left arrow: For the single-line version, type \leftarrow or \gets, followed by spacebar, to produce the output $\leftarrow $. For the more formal double-line version, type \Leftarrow followed by spacebar to produce the output $\Leftarrow$.
Less than: Use the < key on the keyboard to produce the output $<$.
The negation “not less than” can be obtained by first typing a forward slash: /< produces the output $\nless$. Alternatively, type \nlt or \notlt, followed by spacebar, to produce the output $\nless$.
Less than or equal to: Type \le or \leq followed by the spacebar. Or simply press the < key followed by the = key. All of these commands produce the output $\le$.
The negation “neither less than nor equal to” can be obtained by first typing a forward slash: /\le and /\leq followed by spacebar produce the output $\not\leq$. Alternatively, type \nleq followed by spacebar to produce the output $\not\leq$.
Limit: You can type the word lim with an appropriate subscript as shown with the example below.
To obtain $\displaystyle\lim_{n \to \infty}\left(n^2+1 \right)$, type lim_(n \rightarrow \infty ) followed by spacebar, followed by (n^2 +1). Pay attention to each character, including spaces, to produce the desired result.
Line: To produce $\overleftrightarrow{CD}$, type (CD), then \line, then press spacebar twice. Or type (CD), then \tvec, then press spacebar twice.
Logarithms:
-
•To type the common logarithm (base 10), type log followed by spacebar, followed by the content you want to type within the function (use parentheses as needed), followed by the right arrow key to exit the logarithm function to type more math content.
-
•To type the natural logarithm, type ln followed by spacebar, followed by the content you want to type within the function (use parentheses as needed), followed by the right arrow key to exit the natural logarithm function to type more math content.
-
•To type logarithms with other bases, type log followed by the underscore key, followed by the value representing the base, followed by spacebar, followed by the content you want to type within the function (use parentheses as needed), followed by the right arrow key to exit the natural logarithm function to type more math content. For example, ${\log }_{3}\left(x+1 \right)+4$ can be obtained by typing log_3, then spacebar, then (x+1), then the right arrow key, then +4.
M
Maps to: \mapsto followed by spacebar. Produces the output $\mapsto$.
Matrix/matrices:
Note to screen reader users: There are three matrices in the examples below which contain numerical content. See the section of this tutorial on investigating math content in more detail to better understand how to explore the content within the matrices.
-
•To create a 3x3 identity matrix $\left[ ~\begin{matrix} 1 & 0 & 0 \\ 0 & 1 & 0 \\ 0 & 0 & 1 \\ \end{matrix} ~\right]$:
Type [ \matrix 3 ] followed by spacebar. Notice the spacing: One space is typed after the left bracket to create padding on the left side of the matrix. Two spaces are typed between the number 3 and the right bracket; the first space completes the matrix, and the second space creates padding on the right side of the matrix.
If you want a 3x3 identity matrix with no brackets, type \matrix 3 followed by spacebar. If you want curved parentheses to surround the matrix, type ( \matrix 3 ) followed by spacebar. If you want a 2x2 identity matrix with square brackets around it, type [ \matrix 2 ] followed by spacebar, etc.
-
•To create the 3x2 matrix $\left[~\begin{matrix} 1 & 2 \\ 3 & 4 \\ 5 & 6 \\ \end{matrix} ~\right]$:
Type [ \matrix (1&2@3&4@5&6) ] followed by spacebar. Each & symbol separates row elements, and each @ symbol starts a new row. Notice the space typed between the left bracket and the \matrix code to create padding on the left side of the matrix. Also notice that two spaces are typed before the right bracket; the first space completes the matrix and the second space creates padding on the right side of the matrix.
-
•To create the 2x3 matrix $\left[ ~\begin{matrix} 1 & 2 & 3 \\ 4 & 5 & 6 \\ \end{matrix} ~\right]$:
Type [ \matrix (1&2&3@4&5&6) ] followed by spacebar. Notice the single space after the left bracket and the two spaces before the right bracket.
-
•To create an empty 3 x 4 matrix, type [ \matrix (@@&&&) ] followed by spacebar. Notice the single space after the left bracket and the two spaces before the right bracket. A screenshot of the output is below.
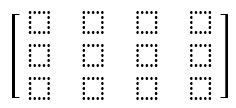
Why do the keystrokes [ \matrix (@@&&&) ] create an empty 3x4 matrix? The \matrix code begins by producing a 1x1 matrix. By typing @@ you are creating 2 additional rows, and by typing &&& you are creating 3 additional columns. After the empty matrix is created, you can go back to the matrix and fill in each matrix cell as desired.
-
•For those who wish to use the equation toolbar rather than creating matrices with Math AutoCorrect codes: There is a Matrix option in the Structures category. Choose the matrix that is closest to the needed size. Then right click on the matrix and look for options to insert or delete rows or columns if needed.
-
•Instead of the square brackets shown above, you can surround matrices with no brackets, with parentheses, with curly braces, with single vertical bars, or with double vertical bars.
Mean: See Bar.
Minus/subtraction: use the keyboard dash/minus sign, -.
Models: See Entails.
mu (lowercase): \mu (all lowercase) followed by spacebar. Produces the output $\mu $.
Multiplication:
-
•To create a multiplication symbol that resembles an x, type \times followed by spacebar. Produces the output $\times $. This symbol is also used for the cross product.
-
•To create a multiplication symbol that looks like a dot, type \cdot followed by spacebar. Produces the output $\cdot $ . This symbol is also used for the dot product.
N
Nabla: See Gradient.
NAND (NOT AND): Type \uparrow followed by spacebar to produce the output $\uparrow$. Type \nand followed by spacebar to produce the output $\barwedge$.
Natural numbers: See Set of natural numbers.
Negation (logical NOT): The logical negation symbol (logical NOT) can be represented in three different ways, as follows.
-
•Type \neg or \not, followed by spacebar, to produce the output $\neg $.
-
•Type \sim followed by spacebar to produce the output $\sim $.
-
•To represent the negation of $p$ by placing a bar over the letter: type \overbar(p), \overline(p), or \seg(p), followed by spacebar, to produce the output $\overline{p}$.
Negations of mathematical relations: Many mathematical relations can be negated by placing a forward slash, /, in front of the relation's Math AutoCorrect code. For example: The subset symbol, $\subset$, can be produced by typing \subset followed by spacebar — and the “not a subset” symbol, $\not\subset$, can be produced by typing /\subset followed by spacebar. Some such negations are included in this tutorial along with the descriptions of the original relations.
NOR (NOT OR): Type \downarrow followed by spacebar to produce the output $\downarrow$. Type \nor followed by spacebar to produce the output $\bar{\vee}$.
NOT: See Negation (logical NOT).
Not equal to: \ne or \neq followed by spacebar. Produces the output $\ne $.
nu (lowercase): \nu (all lowercase) followed by spacebar. Produces the output $\nu $.
O
omega (lowercase): \omega (all lowercase) followed by spacebar. Produces the output $\omega $.
Omega (uppercase): \Omega (with uppercase O) followed by spacebar. Produces the output $\Omega$.
OR: Type \or, \lor, or \vee, followed by spacebar, to produce the logical OR operator, $\vee$.
P
Parallel: \parallel followed by spacebar. Produces the output $\parallel$.
The negation “not parallel” can be obtained by typing \notparallel followed by spacebar, which produces the output ∦.
Parallelogram: Type \parallelogram or \underline, followed by spacebar, to produce the output ▱.
Partial derivative: \partial followed by spacebar. Produces the output $\partial$.
Perpendicular: \perp followed by spacebar. Produces the output $\bot$. This also represents the Bottom symbol.
phi (lowercase): \varphi or \phi (all lowercase) each of which is followed by spacebar. Produces the output $\varphi $ and $\phi $, respectively.
Phi (uppercase): \Phi (with uppercase P) followed by spacebar. Produces the output $\Phi$.
pi (lowercase): \pi (all lowercase) followed by spacebar. Produces the output $\pi $.
Pi (uppercase): \Pi (with uppercase P) followed by spacebar. Produces the output $\Pi$.
Plus/addition: use keyboard plus sign, +.
Plus or minus: Simply press +- (the plus symbol followed by a dash), or alternatively type \pm followed by spacebar. Produces the output $\pm $.
Power: See Exponent.
Prime: Type the apostrophe (single quote) key followed by spacebar, or type \prime followed by spacebar.
-
•To type ${f}'\left( x \right)$: type f, then apostrophe, then spacebar, then (x), then spacebar.
-
•Also see Double prime, Triple prime, Quadruple prime.
Product: \prod followed by spacebar. Produces the output $\prod$.
Proportional to: \propto followed by spacebar. Produces the output $\propto$.
Proves: Type \proves or \vdash, followed by spacebar, to produce the output $\vdash$.
psi (lowercase): \psi (all lowercase) followed by spacebar. Produces the output $\psi $.
Psi (uppercase): \Psi (with uppercase P) followed by spacebar. Produces the output $\Psi $.
Q
Quadratic formula: \quadratic, followed by two spaces. Produces the entire quadratic formula, as shown below:
Quadruple prime: Type four apostrophes (single quote marks) followed by spacebar. Or type \qprime, \quadprime, or \pppprime, followed by spacebar. To type $f''''(x)$: type f, then four apostrophes, then spacebar, then (x), then spacebar.
R
Rational numbers: See Set of rational numbers.
Ray: To obtain $\overrightarrow{CD}$, type (CD), then \ray or \vec, then press spacebar twice.
Real numbers: See Set of real numbers.
Rectangle: \rect followed by spacebar. Produces the output ▭.
Repeating decimal: To type $4.\overline{37}$, type 4.\overbar(37) followed by spacebar. Alternatives to \overbar are \seg, \overline, \repeat, \repeating, and \vinculum.
rho (lowercase): \rho (all lowercase) followed by spacebar. Produces the output $\rho $.
Right angle: \rightangle followed by spacebar. Produces the output ∟.
Right arrow: For the single-line version, type \rightarrow followed by spacebar, or type \to followed by spacebar, or simply type -> (a dash followed by the greater than symbol). All three options produce the output $\to $. For the more formal double-line version, type \Rightarrow, \Implication, or \Implies (all with first letter uppercase), followed by spacebar, to produce the output $\Rightarrow$.
Roots: See Square root, Cube root, Fourth root for details on using the Math AutoCorrect codes \sqrt, \cbrt, and \qdrt.
Any root can be typed using the \sqrt code in conjunction with the ampersand symbol as follows.
-
•$\sqrt[5]{32}$ can be obtained by typing \sqrt(5&32), then spacebar.
-
•$\sqrt[6]{y+1}$ can be obtained by typing \sqrt(6&y+1), then spacebar.
-
•$\sqrt[7]{z^2}+8$ can be obtained by typing \sqrt (7&z^2), then +8.
S
Secant: sec followed by spacebar, followed by the content you want to type within the function (use parentheses as needed), followed by the right arrow key to exit the secant function to type more math content.
Segment: The output $\overline{CD}$ can be produced by typing \seg(CD) followed by spacebar. Alternatives to \seg are \overbar or \overline.
Set of complex numbers: Type \doubleC (with uppercase C) followed by spacebar to produce the output $\mathbb{C}$.
Set of integers: Type \doubleZ (with uppercase Z) followed by spacebar, or \mathbb{Z} (no space needed) to produce the output $\mathbb{Z}$.
Set of natural numbers: Type \doubleN (with uppercase N) followed by spacebar, or \mathbb{N} (no space needed) to produce the output $\mathbb{N}$.
Set of rational numbers: Type \doubleQ (with uppercase Q) followed by spacebar, or \mathbb{Q} (no space needed) to produce the output $\mathbb{Q}$.
Set of real numbers: Type \doubleR (with uppercase R) followed by spacebar, or \mathbb{R} (no space needed) to produce the output $\mathbb{R}$.
sigma (lowercase): \sigma (all lowercase) followed by spacebar. Produces the output $\sigma $.
Sigma (uppercase): \Sigma (with uppercase S) followed by spacebar. Produces the output $\Sigma$. For sums, see Summation/sum.
Similarity/similar to: \sim followed by spacebar. Produces the output $\sim $.
The negation “not similar to” can be obtained by first typing a forward slash: /\sim produces the output $\nsim$.
Sine: sin followed by spacebar, followed by the content you want to type within the function (use parentheses as needed), followed by the right arrow key to exit the sine function to type more math content.
Square root: Type \sqrt or \2root, followed by spacebar, followed by the content that you want included inside the square root (use parentheses as needed), followed by spacebar.
-
•To obtain $\sqrt{x}$ , type \sqrt followed by spacebar, followed by x, followed by spacebar.
-
•To obtain $\sqrt{x+5}$ , where you want the x+5 inside the square root, you must use parentheses. Type \sqrt followed by spacebar, followed by (x+5), followed by spacebar.
-
•To obtain $\sqrt{x+5}+7$, where you want the x+5 inside the square root and the +7 outside the square root: type \sqrt followed by spacebar, followed by (x+5), followed by spacebar, followed by +7.
Subscript: Use the underscore key, SHIFT + MINUS, followed by the subscript (use parentheses as needed), followed by spacebar.
-
•To obtain $x_1+y_1$, type x_1 followed by spacebar, followed by the + sign, followed by y_1, followed by spacebar.
-
•To obtain $3_{n+1}-5$, type 3_(n+1) followed by spacebar, followed by the dash symbol, followed by 5.
Subset: \subset followed by spacebar. Produces the output $\subset$.
The negation, “not a subset”, can be obtained by first typing a forward slash: /\subset produces the output $\not\subset$. Alternatively, type \notsubset followed by spacebar to produce the output $\not\subset$.
Subset or equal to: \subseteq followed by spacebar. Produces the output $\subseteq$.
The negation, “neither a subset nor equal to”, can be obtained by first typing a forward slash: /\subseteq produces the output $\not\subseteq$. Alternatively, type \notsubseteq to produce the output $\not\subseteq$.
Subtraction/minus: use the keyboard dash/minus sign, -.
Summation/sum: The summation symbol is obtained by typing \sum followed by spacebar, followed by the lower and upper limits (instructions are below), followed by spacebar, followed by the desired content.
To type $\sum_{n=1}^{5}\left( {n^2}+1 \right)$ , type \sum followed by spacebar, followed by _(n=1)^5, followed by spacebar, followed by (n^2 +1). If you type the math content on a line by itself, the summation symbol will appear larger with limits of summation above and below (instead of off to the side), as shown below:
$\displaystyle\sum_{n=1}^{5}\left(n^2+1 \right)$
Superscript: See Exponent.
Superset: Type \superset or \supset, followed by spacebar, to produce the output $\supset$.
The negation, “not a superset”, can be obtained by first typing a forward slash: /\superset produces the output $\not\supset$. Alternatively, type \notsuperset followed by spacebar to produce the output $\not\supset$.
Superset or equal to: \superseteq followed by spacebar. Produces the output $\supseteq$.
The negation, “neither a superset of nor equal to”, can be obtained by first typing a forward slash: /\superseteq produces the output $\not\supseteq$. Alternatively, type \notsuperseteq followed by spacebar to produce the output $\not\supseteq$.
Surface integral: \oiint, followed by spacebar. Produces the output ∯. See Integrals for additional instructions on typing integrals.
T
Tangent: tan followed by spacebar, followed by the content you want to type within the function (use parentheses as needed), followed by the right arrow key key to exit the tangent function to type more math content.
tau (lowercase): \tau (all lowercase) followed by spacebar. Produces the output $\tau $.
There exists: Type \exists or \forsome, followed by spacebar, to produce the output $\exists$.
Therefore: \therefore followed by spacebar. Produces the output $\therefore $ .
theta (lowercase): \theta (all lowercase) followed by spacebar. Produces the output $\theta $.
Theta (uppercase): \Theta (with uppercase T) followed by spacebar. Produces the output $\Theta$.
Times: See Multiplication.
To: See Right arrow.
Top: Type \top or \tautology, followed by spacebar, to produce the output $\top$.
Triangle: \triangle followed by spacebar. Produces the output $\vartriangle$.
Triple integral: Type \tripleint or \iiint to produce the triple integral symbol, $\iiint$. See Integrals for additional instructions on typing indefinite and definite integrals.
Triple prime: Type three apostrophes (single quote marks), followed by spacebar. Or type \tprime, \tripleprime, or \ppprime, followed by spacebar. To type $f'''(x)$: Type f, then three apostrophes, then spacebar, then (x), then spacebar.
U
Union:
-
•Type \union or \cup, followed by spacebar, to produce the output $\cup$.
-
•For big union (union over many sets, n-ary union), type \Union (with uppercase U) or \bigcup, followed by spacebar, to produce the output $\bigcup$. To obtain the output $\bigcup_{i=1}^5 A_i$, type \Union_(i=1)^5 A_i followed by spacebar (also notice the space between the 5 and the A). If typed on its own line, the big union symbol will appear larger with the upper and lower limits shown above and below (instead of off to the side), as shown below.
$$\large \bigcup_{i=1}^5 A_i$$
Up arrow: For the single-line version, type \uparrow followed by spacebar to produce the output $\uparrow$. For the double-line version, type \Uparrow (with first letter uppercase) to produce the output $\Uparrow$.
V
Vectors:
-
•To obtain the output $\overrightarrow{CD}$, type (CD), then \vec or \ray, then press spacebar twice.
-
•To obtain the output $\vec{x}$, type x, then \vec or \ray, then press spacebar twice.
Vertical bars: Type \vert followed by spacebar for each vertical bar, or simply type the pipe symbol (vertical bar), |, from your keyboard.
-
•To write the absolute value expression $\displaystyle\left|\frac{c}{d}\right|$, type the pipe symbol, the fraction c/d, spacebar, another pipe symbol, and then press spacebar to cause the vertical bars to enlarge to the size of the expression.
-
•To write the determinant of A, $|A|$, type the pipe symbol, the letter A, and then another pipe symbol.
Volume integral: \oiiint, followed by spacebar. Produces the output ∰. See Integrals for additional instructions on typing integrals.
X
XNOR: See Circle with dot.
XOR: See Exclusive OR.
Z
zeta (lowercase): \zeta (all lowercase) followed by spacebar. Produces the output $\zeta $.
6. Troubleshooting for Math AutoCorrect codes
If the Math AutoCorrect codes from the above list are not producing the desired content, try each of the steps below (one at a time) to see if the problem is resolved.
-
1)Go to the File menu, select Options (you may need to select File, then More, then Options), then select Proofing, then navigate to the button that says AutoCorrect Options. Choose the tab that says Math AutoCorrect. Make sure that the checkbox Replace text as you type is checked. (This checkbox should be checked by default and would likely only be disabled if you chose to disable it.)
-
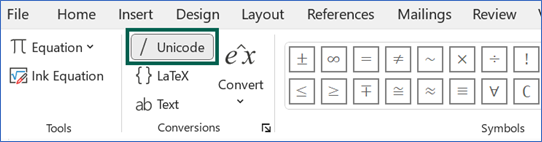
2)Open the equation tool by pressing ALT+EQUALS. Then navigate to the Conversions group of the equation toolbar and make sure that the Unicode option is chosen, rather than LaTeX or Text.
-
3)If you have ever customized the Math AutoCorrect codes on your computer (described in this tutorial's section on Adding Math AutoCorrect codes), some updated codes from Microsoft may not have populated to your computer. In this case, you may need to reset these codes to Microsoft's built-in list; follow the instructions to “Reset the AutoCorrect list to the built-in list” at Microsoft's quick start guide to Math AutoCorrect commands and symbols.
7. Editing equations and switching between linear & professional modes
After you have created an equation in its nicely displayed format, known as professional format, you may find that you need to go back and edit it. You can choose to edit the equation within professional format, or you can switch from professional format to linear format, which displays your source input (or input similar to what you entered).
To switch to linear format, place your cursor within the desired equation and press CTRL + SHIFT + EQUALS. You can alternatively navigate to the Convert dropdown of the Conversions group and select Current - Linear, as shown below. Edit the equation as needed.
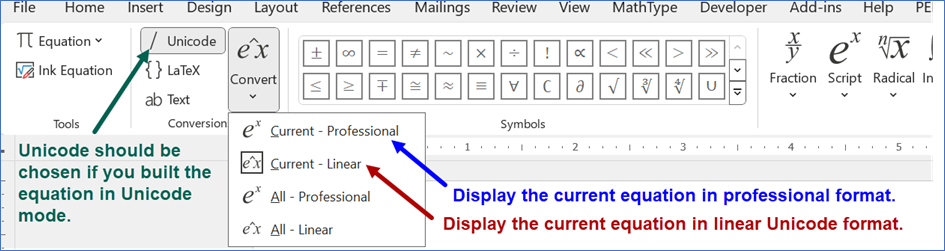
To switch back to professional format, place your cursor within the desired equation and press CTRL + EQUALS. You can alternatively navigate to the Convert dropdown of the Conversions group and select Current - Professional, as shown above.
A sample equation, typed in Unicode, is shown in both professional and linear formats below.

This method of converting between professional and linear formats can also be used in LaTeX mode which is discussed later in this tutorial. (Note that if you create an equation in Unicode mode and then convert that equation within LaTeX mode, or vice versa, you may encounter unexpected results.)
8. Discovering additional Math AutoCorrect codes
The above list of Math AutoCorrect codes is not exhaustive. Below are a number of methods you can use to discover additional Math AutoCorrect codes for Word's equation tool:
-
1)Look for Math AutoCorrect codes listed within the equation toolbar
(Note: This method is difficult to accomplish with a screen reader.)
Go to the Symbols group and hover over any symbol. A box then appears with the name of the symbol — and if a Math AutoCorrect code can be used to replicate that symbol, it is listed in parentheses after the symbol name. For example, if you navigate to the Basic Math category of symbols and hover over the cube root symbol, a box appears which says, “Cube root (\3root \cbrt).” This means that if you want the cube root symbol to appear in Word's equation tool with a Math AutoCorrect code, you should type \3root or \cbrt; these codes must be followed by the spacebar.
Remember that on the right side of the Symbols menu, the Symbols dropdown gives you access to entire additional categories of symbols (Basic Math, Greek Letters, Letter-Like Symbols, Operators, Arrows, Negated Relations, Scripts, and Geometry). You can explore each of those symbol categories and hover over desired symbols to find out the Math AutoCorrect codes that are already programmed into Microsoft Word. To review how to access the symbol categories, see the section on exploring the equation toolbar.
-
2)Check out the DAISY Consortium's list of Math AutoCorrect codes, organized by subject
A list of commonly used Math AutoCorrect codes, organized by subject and in tabular format, has been written by a working group of the DAISY Consortium (of which the author of this tutorial is a part). The link is below.
DAISY Consortium List of Commonly Used Math AutoCorrect Codes. -
3)Check out Microsoft's Quick start guide to Math AutoCorrect commands and symbols
This webpage from Microsoft contains a long list of available math symbols along with their corresponding Math AutoCorrect codes..
-
4)Find the list of Math AutoCorrect codes within Microsoft Word
-
5)Look up and try LaTeX commands (while still in Unicode conversion mode)
Many of the Math AutoCorrect codes are identical to commands used in a mathematical typesetting system known as LaTeX. If there is a symbol that you want to create which is not included in this document, do an online search to find the LaTeX command for that symbol, and then try that LaTeX command in Word's equation tool both with and without a backslash symbol at the start of the command. (This does not work for every command but works for many of them.) As you have seen earlier in this document, it is often necessary to press spacebar after a Math AutoCorrect code for the symbol/function to show up properly and to read properly with a screen reader.
-
6)Find the Unicode representation for the desired character
Visit a website such as Unicode Explorer or Unicode Plus and use the search bar to type in a name or description for a desired symbol. Suppose that you are looking for the symbol $↯$, a downward pointing zigzag arrow which looks like a lightning bolt. (This symbol is sometimes used to indicate a contradiction.) You can find this symbol in the two Unicode webpages linked above if you search for the word “zigzag” or “arrow” (without quotes), and the Unicode symbol corresponding to $↯$ is shown to be U+21AF. To produce the $↯$ symbol in Microsoft Word, press ALT + EQUALS, followed by the characters 21AF, followed by pressing ALT + x (where that the ALT key and x key need to be pressed at the same time).
Below are two methods of accessing Microsoft Word's list of Math AutoCorrect codes.
Option 1:
Expand the Conversions group of the Equation toolbar. (If the Equation toolbar is not visible, type ALT + EQUALS so that it will appear.) Select the Math AutoCorrect button in the resulting Equations Options dialog box, and a table of hundreds of Math AutoCorrect codes will appear.
Option 2:
Under the File menu, select Options (you may need to select More... then Options), then Proofing. Select the AutoCorrect Options button and then select the tab for Math AutoCorrect. A table of hundreds of Math AutoCorrect codes will appear.
9. Adding Math AutoCorrect codes
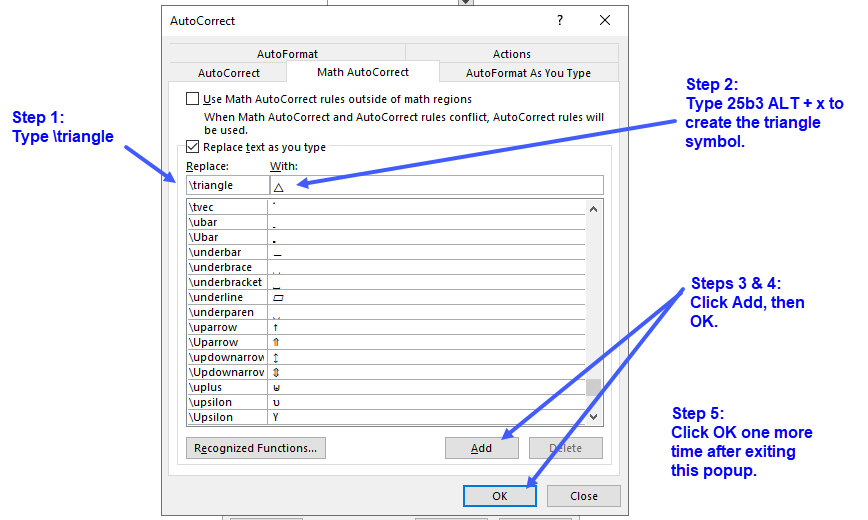
You can add Math AutoCorrect codes to Microsoft Word's list of codes. The four steps below describe how to add new codes for the symbols $↯$, $\cap$, and $▱$.
Step 1: Choose new Math AutoCorrect codes
Suppose that you want to create your own Math AutoCorrect codes for the three symbols below.
-
•Downward pointing zigzag arrow: In the above section, we discussed how to find the Unicode representation for a desired character. We found that the downward pointing zigzag arrow, $↯$, has the Unicode value U+21AF, and that this symbol can be produced by pressing ALT + EQUALS, typing 21AF, and then typing ALT + x. Suppose that you would like to have the option of typing \lightning to produce this character, since it resembles a lightning bolt. (First try pressing ALT + EQUALS and entering \lightning; you can see that no such Math AutoCorrect code already exists within Word's built-in codes.)
-
•Intersection symbol: The intersection symbol, $\cap$, can be created with the Math AutoCorrect codes \cap or \intersection. Suppose that you would like to have the option of typing \inter to have a relatively short and intuitive code. (Note that \int is already in use for the integral symbol, $\int$, and therefore should not be used for the intersection symbol. The code \inter, on the other hand, is not a built-in code.)
-
•Parallelogram symbol: The parallelogram symbol, $▱$, can be created with the Math AutoCorrect codes \parallelogram or \underline. Suppose that you would like to have the option of typing \par to have an intuitive code that takes less time to type. (First try pressing ALT + EQUALS and entering \par; you can see that no such Math AutoCorrect code already exists within Word's built-in codes.)
Step 2: Look up Unicode values for the desired characters
Visit a website such as Unicode Explorer or Unicode Plus to search for the Unicode values of the desired characters $↯$, $\cap$, and $▱$.
-
•The downward pointing zigzag arrow, $↯$, has Unicode value U+21AF (discussed earlier; can search for “zigzag” or “arrow” without quotes).
-
•The intersection symbol, $\cap$, has Unicode value U+2229 (can search for “intersection” without quotes).
-
•The parallelogram symbol, $▱$, has Unicode value U+25B1 (can search for “parallelogram” without quotes).
Step 3: Open the list of Math AutoCorrect codes within Microsoft Word
Below are two methods of accessing Microsoft Word's list of Math AutoCorrect codes:
Option 1
Expand the Conversions group of the Equation toolbar. (If the Equation toolbar is not visible, type ALT + EQUALS so that it will appear.) Select the Math AutoCorrect button in the resulting Equations Options dialog box, and a table of hundreds of Math AutoCorrect codes will appear.
Option 2
Under the File menu, select Options (you may need to select More... then Options), then Proofing. Select the AutoCorrect Options button and then select the tab for Math AutoCorrect. A table of hundreds of Math AutoCorrect codes will appear.
Step 4: Add the new desired Math AutoCorrect codes
We can now add our proposed codes to the Math AutoCorrect list.
-
• Add the desired Math AutoCorrect code for the downward pointing zigzag arrow
The downward pointing zigzag arrow, $↯$, has Unicode value U+21AF. Type \lightning in the box that says “Replace” and type 21AF ALT + x in the box that says “With” (the downward pointing zigzag arrow should appear). Then select Add, select OK, and select OK again after exiting the dialog box.
You should now be able to use \lightning as a custom Math AutoCorrect code for the downward pointing zigzag symbol, $↯$. (Or you could still type 21AF ALT + x.)
-
• Add the desired Math AutoCorrect code for the intersection symbol
Open the list of Math AutoCorrect codes as described above. Type \inter in the box that says “Replace” and type 2229 ALT + x in the box that says “With” (the intersection symbol should appear). Then select Add, select OK, and select OK again after exiting the dialog box.
You should now be able to type \inter as a custom Math AutoCorrect code for the intersection symbol, $\cap$. (Or you could still type \cap, \intersection, or 2229 ALT + x.)
-
• Add the desired Math AutoCorrect code for the parallelogram symbol
Open the list of Math AutoCorrect codes as described above. Type \par in the box that says “Replace” and type 25B1 ALT + x in the box that says “With” (the parallelogram symbol should appear). Then select Add, select OK, and select OK again after exiting the dialog box.
You should now be able to type \par as a custom Math AutoCorrect code for the parallelogram symbol, $▱$. (Or you could still type \parallelogram, \underline, or 25B1 ALT + x.)
10. Typing equations with LaTeX in Word
If you know how to use LaTeX to type math content, navigate to the Conversions group of Microsoft Word's equation toolbar and select LaTeX, as shown in red in the screenshot below.

You can then experiment with typing content as you would in LaTeX to see if those commands work within Word's equation tool. Do not type starting and ending LaTeX tags.
To make your linear input display nicely in professional mode, click within the LaTeX math content that you wish to convert and do one of the following: 1) press CTRL + EQUALS, 2) press Enter, which also causes a line break, or 3) select the Convert dropdown and then select Current - Professional as shown in the screenshot below.
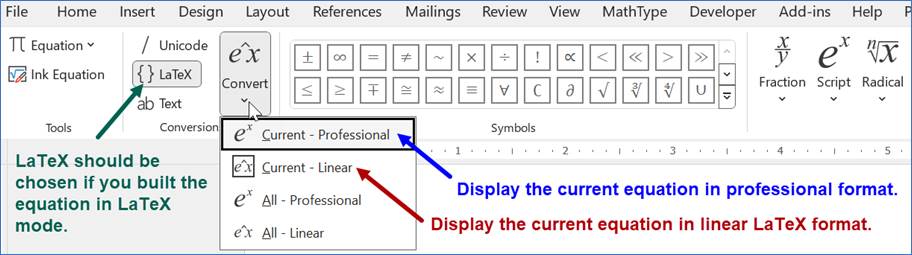
To return an equation to linear mode from professional mode in order to edit the math content with LaTeX: While in LaTeX conversion mode, click within the math content that you wish to edit and then 1) Press CTRL + SHIFT + EQUALS, or 2) select the Convert dropdown and then select Current - Linear as shown in the screenshot above. The equation box should then display LaTeX code. Edit as needed.
When finished editing, press CTRL + EQUALS or choose Current - Professional for the math to display in professional format again.
A sample equation, typed in LaTeX, is shown in both professional and linear formats below.

Some LaTeX commands work within Word's equation tool and others do not. You can create the fraction $\frac{3}{5}$, for example, by typing \frac{3}{5} but cannot precede the fraction with the \displaystyle command to make it larger.
For more information about typing LaTeX within Microsoft Word, visit Microsoft's article, Linear format equations using UnicodeMath and LaTeX in Word, and navigate to the section entitled “LaTeX equation editing examples.”
To read more about improved LaTeX support in Word (as well as in PowerPoint, Excel, and OneNote), refer to the following blog post by Microsoft's Peter Wu: From LaTeX to accessible PDFs: Transforming math workflows in Microsoft 365.
Note: If you want to return to using the alphabetical list of Math AutoCorrect codes shown earlier in this document, you must also return to the Conversions group of the toolbar and select Unicode instead of LaTeX.
11. Text mode
Using the Text option in the Conversions group
There are times when you may want to combine math content and text within a math expression. If you press ALT + EQUALS and type CD=7 cm while the Unicode conversion mode is selected, it yields the output shown below.
![]()
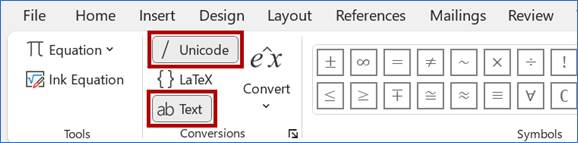
Notice that the abbreviation for centimeters is italicized. If you want cm to instead appear as non-italicized text but remain in the equation box, first type CD=7 while strictly in Unicode mode, followed by spacebar (to create a space between the 7 and the cm). Then select the Text option in the Conversions group, as shown below; notice that Unicode and Text are both selected.
Then type cm within the equation box. The resulting math output is as follows, where the abbreviation for centimeters is not italicized but still appears within the equation box.
![]()
Shortcut for accessing Text mode
Instead of selecting the Text option in the Conversions group, you can remain strictly in Unicode mode and place the desired non-mathematical text within double quotation marks. For the example above, press ALT + EQUALS to start a new equation, make sure that Text mode is no longer selected, and type the following:
CD=7 “cm” followed by spacebar
This yields the desired output, where the centimeters abbreviation is not italicized.
![]()
As another example, suppose that $\angle B$ is an acute angle of a right triangle and that we want to type the following, where all words within the equation box are non-italicized except for $\angle B$:

To create the equation as shown above, press ALT + EQUALS, type “The sine of” followed by pressing spacebar TWICE; the first instance of spacebar changes the expression in quotation marks to text mode, and the second instance creates space between words/expressions. Then type \angle B followed by the equals sign. Then type a forward slash followed by spacebar to create an empty fraction (or select a fraction style from the Structures group of the equation toolbar). Navigate to the numerator and type “the length of the side opposite” followed by TWO spaces. Then type \angle B. Navigate downward to the denominator and type “the length of the hypotenuse” followed by spacebar.
12. Equation display size and other options
Changing the equation display size
Some expressions will show up larger if placed on a line that contains only math content. For example, the integral symbol and the fraction in the equation $\int {x^2}dx=\frac{x^3}{3}+C$ appear larger if the equation is placed on its own line:
$\displaystyle\int{x^2}dx=\displaystyle\frac{x^3}{3}+C$
An entire equation can also be made larger by selecting the equation and changing the font size, under the Font group of Microsoft Word's Home menu.
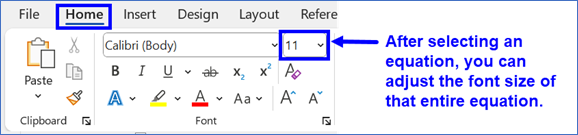
For example, the equation $x+\frac{3}{5}=7^2$ is written in 14-point font, where $x+\frac{3}{5}=7^2$ is shown in 18-point font.
No option currently exists in Microsoft Word to change the size of one portion of an equation but not another (such as changing only the size of a fraction or an exponent); if you find such an option, please send a note via the feedback section.
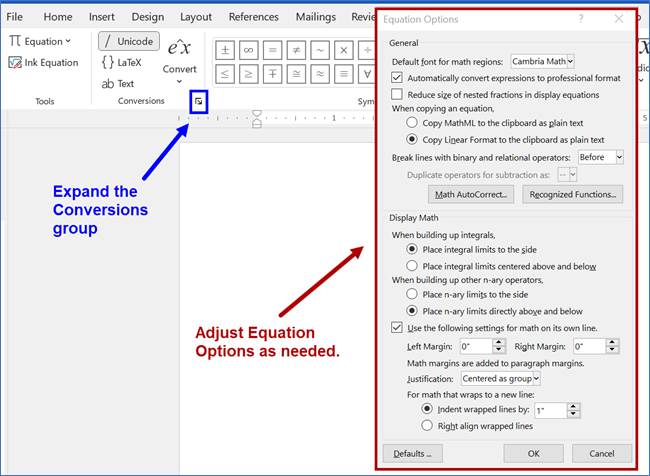
Changing other equation options
You can adjust other equation options in Microsoft Word as follows: Press ALT + EQUALS and expand the Conversions group, as shown. A dialog box appears entitled Equation Options. Read through the options and adjust as desired.
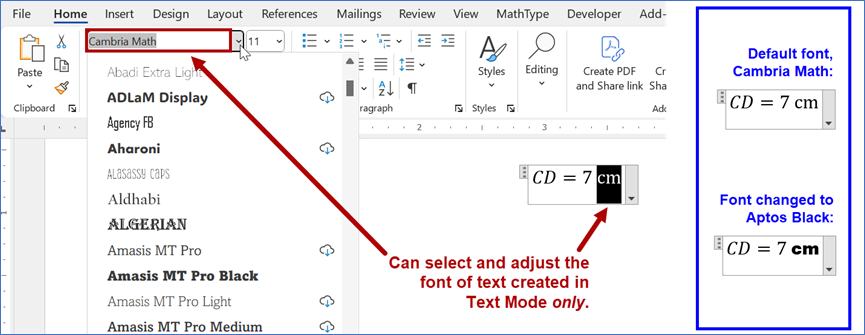
The default font for equations is Cambria Math and no option seems to exist to change the font of the math content within an equation. However, if you type any equation content in Text Mode, you can adjust that specific text-based equation content from the Font group of Microsoft Word's Home menu. For example, in the equation $CD=7~\text{cm}$, the font style can be changed for the centimeters label only, as shown below. (If you discover a way to adjust the font of math content not typed in Text mode, please send a note via the feedback section.)
13. Setting a Word document to open in read-only mode
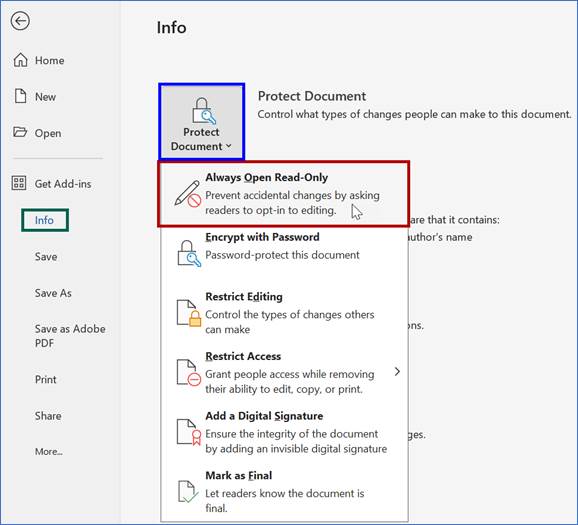
If you will be sharing your Word document with someone else and your intention is for them to only read it (not edit it) or if you want to read your own document without accidentally making changes as you scroll through, you can set the document to open in read-only mode as follows: Go the File menu and choose Info. Select the dropdown entitled Protect Document. Then select the option Always Open Read-Only as shown in the screenshot below. This selection ensures that the document opens in read-only mode, but be aware that people can still opt-in to edit the document and/or could edit the file after saving it with a different filename. You can investigate additional protection options that are available below the read-only option, but they will not be discussed further here.
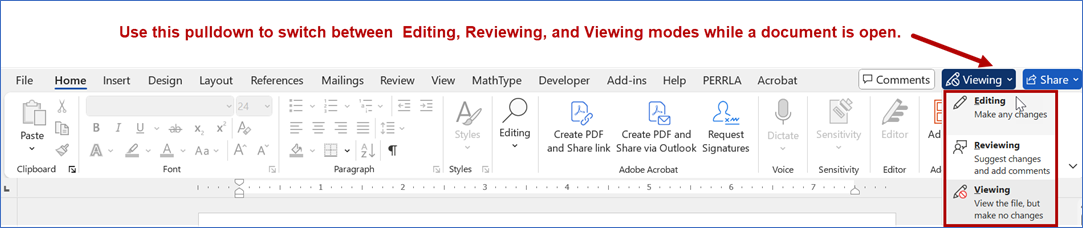
If you want to edit your document after it has been set to open in read-only mode, you don't need to undo your protection settings; you can instead choose Editing mode using the drop-down menu near the upper right of Word's ribbon. This dropdown is found between the Comments and the Share buttons and is shown in the screenshot below. You can use this dropdown to switch between Editing, Reviewing, and Viewing modes while the document is open. After closing and reopening the document, it will still open in read-only mode.
If you no longer want the document to open in read-only mode, you can once again click File, then Info, then Protect Document, and deselect the option to Always Open Read-Only.
14. Math accessibility tips
The following math accessibility tips are intended for individuals who are using the JAWS or NVDA screen readers, or for those who are preparing accessible documents for others. (To learn how to use JAWS, visit the University of Houston's JAWS screen reader tutorial.)
Continuous versus line-by-line navigation with math content
When a Word document contains math content, JAWS occasionally skips over some of the math content when reading continuously in “Say All” mode; the reading of math content is more reliable when you navigate line-by-line in JAWS with the down arrow instead.
Investigating math content in more detail
Investigating math content with JAWS
JAWS has a tool known as the Math Viewer which allows you to investigate math content in more detail; the math content appears in a separate window and you can navigate through the expression using the arrow keys.
-
•To open the Math Viewer in Microsoft Word, press INSERT + SPACEBAR followed by EQUALS when focused on the desired math content. To exit the Math Viewer, press ESC.
-
•To open the Math Viewer in a web browser, press the ENTER key when focused on the desired math content. To exit the Math Viewer, press ESC.
To learn more about using the Math Viewer, refer to the section entitled “Studying Equations in the Math Viewer” on Freedom Scientific's webpage Accessing Math Content with JAWS and Fusion.
Note: If you get a script error while trying to use the Math Viewer, visit Freedom Scientific's technical bulletin to fix script errors in the Math Viewer.
Investigating math content with NVDA
To enter math navigation mode in NVDA in both Microsoft Word and in a web browser, press the NVDA key + ALT + M. To exit math navigation mode, press ESC. To learn more about navigating math expressions within NVDA, visit the MathCAT user guide for NVDA as well as MathCAT's navigation commands page.
Sound cues when entering and exiting math expressions
Microsoft provides an optional accessibility feature called “Feedback with sound,” which includes sound cues when a user enters and exits a math expression. When enabled, the feedback with sound feature applies to all Microsoft 365 programs and generates sounds for a variety of actions on the computer including saving a file, cutting and pasting, sending an email, receiving notifications or errors, etc. To enable feedback with sound, select File, then Options, then Accessibility, and check the option to Provide feedback with sound. You can then use the pulldown menu to choose the Modern theme which has more subtle sounds or choose the Classic theme which uses more pronounced sounds. For more information, see Microsoft's article on Getting started with Office Sounds.
15. Typing math in PowerPoint
This tutorial focused on typing math in Microsoft Word, but it is worth noting that math expressions can be typed in Microsoft PowerPoint using methods similar to those discussed in this tutorial. To view some keyboard shortcuts for working with mathematics in PowerPoint, refer to the following blog post by Microsoft's Peter Wu: Make math inclusive for everyone with Microsoft 365.
16. Demonstrations of math accessibility features within Microsoft 365 products
The video demonstrations below highlight a range of exciting math accessibility features across Microsoft 365 products. These demos come from Accessible Math Unlocks STEM Education and Careers, presented at the Microsoft Ability Summit 2026 by Peter Wu from Microsoft, George Kerscher and Richard Orme from the DAISY Consortium, and Sara Shunkwiler from Johns Hopkins University.
-
•Turning on the “Provide feedback with sound” feature (6:27)
-
•Copy math from Microsoft 365 apps and paste into other apps (29:17)
-
•Enter and edit math in LaTeX; includes discussion of support for chemistry (30:03)
-
•Convert Equation Editor and MathType objects to OfficeMath (39:56)
Contact / Feedback
If you have any questions or feedback about typing math in Microsoft Word or about creating accessible mathematics, contact:
Jennifer Marsala, Instructional Designer
University of Houston Department of Mathematics
Email: jmarsala@central.uh.edu